Online blogging has become a medium that almost everyone is familiar with and everyone is ready to take advantage of it. So today I am going to tell you the method of making the blog live in 7 steps here. This will help you in starting the blog by deciding the journey from novice to professional.
.So let’s start without losing time –
Choose blog topic
The most important thing in the first phase is to choose a subject under which you want to write, such as travel, technical, business, fitness, etc.
Here it is also necessary that you choose the topic according to your skill so that you will also be interested in writing it.
And if it is a bit difficult for you, then do a little research. With this, you will get to experience both the style and the subject of writing the blog.
Select blogging platform
The choice of a blogging platform depends on your two points.
1 – A free platform to live a blog.
2 – A paid platform to start a blog.
Let’s know: Top Blogging Platforms
I would like to explain both of these things in a nutshell that free blogging will be useful for you, but you will not have full control over it, whereas this is not the case on a paid platform.
Secondly, on the free platform, you may face problems like traffic, downtime, spam boats, etc. So it is better to choose a paid platform. This does not mean that you need to have programming; you can do it easily with WordPress.
On the other hand, if you have a good hand in website designing, then you can start blogging with lots of paid and free themes.
Domain & Hosting Plan
The next step is for you to choose the domain name and hosting. If you have chosen Word Press, you can choose both domains and host from there. Or buy hosting from many well-known providers such as Blue Host, HostGator, etc., and can proceed with Word Press application or theme by themselves.
Let’s know: Get the Best Hosting Plan
Configure Blog settings
Here I will tell you some easy setup of a WordPress blog so that when you start a blog or article you will not face any problem. These small settings also mean a lot, so don’t ignore them.
- Login to your WordPress dashboard. (yourdomain.com/wp-admin)
- Find and click on Settings >> General from the left sidebar.
- Go to the title and fill in the name of the site, it is used by search engines to index the website. Then fill in the tag line “A quick means to your website in short”.
- Fill in the Word Press URL and Site URL, and others are filled in.
Click Reading in the drop-down menu of Settings, and then make sure “Search Engine Visibility” is unchecked. Leave it unchecked otherwise, your website will disappear temporarily from the search engines.
- Again setting menu >> Permalinks >> enable “Post Name”.

Note- Do not forget to click on the Save changes button in each setting field.
Select Theme
WordPress is a huge open source website with lots of websites theme, you can choose any theme you need and make it live. Follow the steps below to add or change a new theme.
- Go to Appearance >> Click on Theme >> Add New
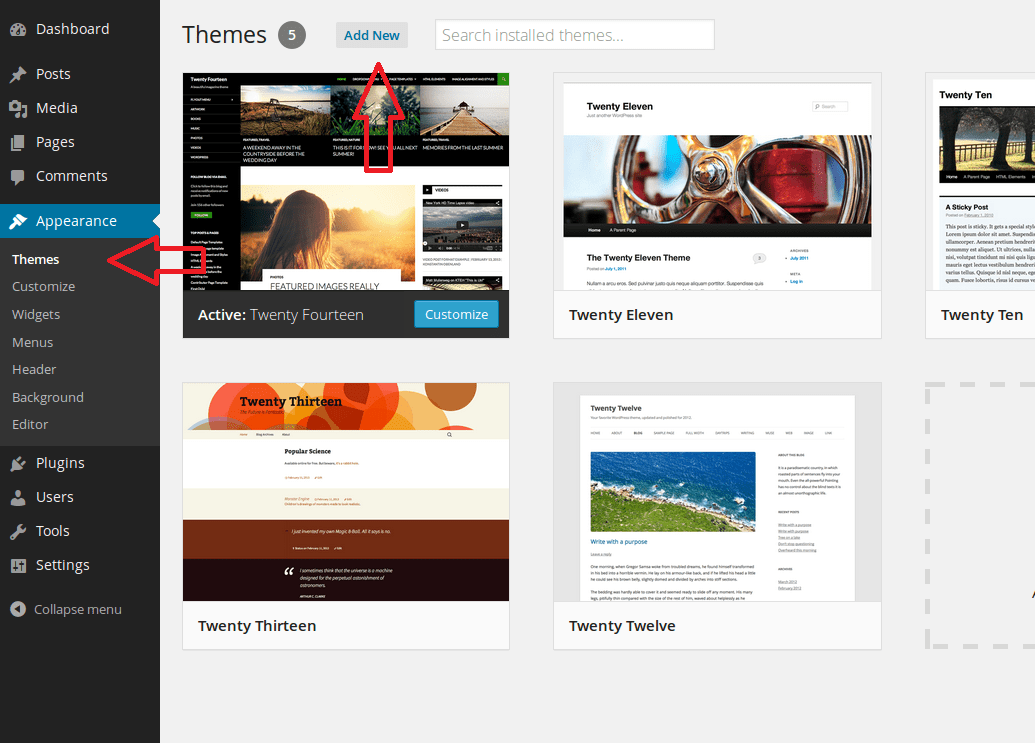
Now some themes will be present in front of you, you can choose any of them or you can search any existing theme using the search window. Not only this, but you can also upload any Word Press theme.
Make additional changes to the site theme
We are in the second last stage of starting the blog; here you have to make changes according to the new theme like logo, colors, font style, etc.
Follow these steps to change them
- Go to Appearance >> Click on Customize

After doing this, you will see options related to the theme on the left hand – site, color, header, etc. and the theme of the website directly on the hand, in which some blocks in the pen mark will also becoming. By clicking on these, you can access all the properties of that department.
Let us also see a brief overview of the facilities:
- Site Identity – Here you can give a logo or site name which you want to give.
- Color – Here we can change the color of the background.
- Header Image – If you want to add an image to the header of this website.
- Background Image – Add images to the background
- Menus – Check the menu of the site as there will be pre-made menus according to the theme here, check them or change them as per your requirement.
- Widgets – These are small block functions that have some special effect on your website and there are many types like – text, recent post, archive, search, etc.
Apart from this, there are many options that you will be able to know according to the theme.
Let’s know: Add WordPress site to Search Console
Start Blog, share & Repeat
Congratulations, you have reached very close to making the blog live, all you have to do is that you have to search for the word related to the topic on which you are writing the blog. What will happen with this? With this, your blog will rank on those keywords, which will increase the chances of increasing traffic on the blog.
Once you find the keyword, you have to write a nice blog and just live it. In the end, all you have to do is share it on social sites and the site of any related form.
Now you can write and publish a blog at any time.
Closing Word
After you achieve your goal of starting a blog, you can publish one blog after another. These steps of making the blog live are described in very simple words, yet comment for any related information.